


Blog 6: Color Circle Operations

Blog: 6 Color Circle Operations
This is one of the most vitally important blogs you will need to master in order to be an effective FAA website developer, operator or buyer. Review it as often as you need in order to make this a part of your basic skills.
This important blog is a little longer than my others … with a lot of important details … but it is easier to master than you think!
Be prepared to review this information until you are its master … and once you get it … you will know more about colors, shading, and tinting than most people in the world!
Here is what you need to know about products on FAA websites and available color selections … but too many website operators may be depending on their visitors to already be adept at what they are doing … and that is a BIG mistake.
Not all products have the same color choices available. Some products may have:
-
- only one- or two-color patch choices …
- or up to 72 color patch choice …
- or color patch choices and access to the Color-Wheel and Shade-Tint Box.
In general, Color Wheel + Color Box is NOT present on:
-
- WALL ART … except for Tapestries
- Apparel (but colors are available in color patches)
The Color Wheel + Color Box is usually present on most:
-
- Home Décor:
- Lifestyle
- Beach
- Stationery
- Tech
- Face Masks
VARIOUS CATEGORIES
Some FAA websites might not contain a “Collections” category … but if they do … the images could be used on any option. Nevertheless, regardless of what some categories are called … the image applications and management are basically the same across all FAA artists’ websites.
However, remember that not all options will have access to the Color Wheel + Color Box as explained above for certain product choices.
NOTE: On some products the size of the image placement takes up all the border space … and the BACKGROUND COLOR option with Color Patches does not appear … until the image size is reduced.
The IMAGE SIZE … is controlled by the Slider … for a product. Move the Slider left to reduce the image size or right to increase the image size.
If the Color Wheel + Color Box is available for a product, it will not appear … until … the image size is reduced to allow the BACKGROUND COLOR option to appear.
When Image Size control is available on a product … it is usually controlled by moving the Image Size Slider back and forth (i.e., left and right) … to place it on a background of some sort.
IMAGE SLIDER OPERATIONS
Watch carefully when moving the Image Size Slider back and forth. To detect for the presence of color patches and/or the Color Wheel + Tint Box for a product … DO THIS:
-
- Move the Image Size Slider all the way to the right with your mouse control and release it. You may not see any color patch options or the Color Wheel + Tint Box. This usually means that the image will cover over any background space that may be present.
- Move the Image Size Slider all the way to the left with your mouse control and release it. You will see any color patch options … and the Color Wheel + Tint Box … that are available for this product’s background color.
- Move the Image Size Slider left and right until you get the image size you want on the product’s background. And if you want background color options for your image … move the slider until you place the image where you want it and can still use your background color options.
- Note: Sometimes the color options might also apply to the image itself … but with experience and experimenting … you will quickly be able to decide what color options you want.
If a product also gives access to the Color-Wheel and Shade Tint Box … you will see this link:
Show More Colors beneath the available BACKGROUND COLOR patches.
Here is an example to show how you will know what color access you have on a product [ i.e., these images are from FAA and should represent what you will actually encounter for use on any artist’s FAA website]:
BECOME A COLOR-WHEEL MASTER
This is one of the most important blogs you must master in order to be an effective FAA website developer, operator or buyer.
This important blog is a little longer than my others … with a lot of important details … but it is easier to master than you think!
Be prepared to review this information until you are its master … and once you get it … you will know more about colors, shading, and tinting than most people in the world!
Here is what you need to know about products on FAA websites and available color selections … but too many website operators may be depending on their visitors to already be adept at what they are doing.
Not all products have the same color choices available. Some products may have:
-
- only one or two color patch choices;
- or up to 72 color patch choice;
- or color patch choices and access to the Color-Wheel and Shade-Tint Box.
In general, Color Wheel + Color Box is NOT present on:
-
- WALL ART … except for Tapestries
- Apparel (but colors are available in color patches)
The Color Wheel + Color Box is usually present on most:
-
- Home Décor:
- Lifestyle
- Stationery
- Tech
- Face Masks
Some FAA websites might not contain a “Collections” category … but if they do … the images could be used on any option. However, remember that not all options will have access to the Color Wheel + Color Box as explained above for certain product choices.
NOTE: On some products the size of the image placement takes up all the border space … and the BACKGROUND COLOR option with Color Patches does not appear … until the image size is reduced.
The IMAGE SIZE … is controlled by the Slider … for a product. Move the Slider left to reduce the image size or right to increase the image size.
If the Color Wheel + Color Box is available for a product, it will not appear … until … the image size is reduced to allow the BACKGROUND COLOR option to appear (but only if there is a background associated with the image in the category being used).
When Image Size control is available on a product … it is usually controlled by moving the Image Size Slider back and forth (i.e., left and right) … to place it on a background of some sort.
Watch carefully when moving the Image Size Slider back and forth. To detect for the presence of color patches and/or the Color Wheel + Tint Box for a product … DO THIS:
-
- Move the Image Size Slider all the way to the right with your mouse control and release it. You may not see any color patch options or the Color Wheel + Tint Box. This usually means that the image will cover over any background space that may be present.
- Move the Image Size Slider all the way to the left with your mouse control and release it. You will see any color patch options … and the Color Wheel + Tint Box … that are available for this product’s background color.
- Move the Image Size Slider left and right until you get the image size you want on the product’s background. And if you want background color options for your image … move the slider until you place the image where you want it and can still use your background color options.
- Note: Sometimes the color options might also apply to the image itself … but with experience and experimenting … you will quickly be able to decide what color options you want.
If a product also gives access to the Color-Wheel and Shade Tint Box … you will see this link:
Show More Colors beneath the available BACKGROUND COLOR patches.
So that you do not get confused … here is the color patch example again.
Remember, you will be able to use any of the Background Color patches you see (i.e., 72 shown above).
Keep in mind: The appearance of any color options usually means that the image does not occupy all of the available space on a background (i.e., if a background is available for the image you are using).
Notice: The Default block … beneath the color patch examples … is the original color of the product the website owner designed. That means you can go back to the default color if you did not like any of the colors you experimented around with (i.e., you will not lose the original color by experimenting).
If you do not change it with a different color patch … or a color you generate with the Color Wheel/Color Box tool … the default color will be the color of the product you order.
Don’t worry. Play around all you want to. You can always go back to the product’s Default color by clicking the link: Show Basic Colors (see image below) … and you will see the original Default color patch beneath the listing of Background Color patches (see image above).
Just click it and you will have your original product and color back in front of you.
NOTE: If you DO NOT see the link: Show More Colors beneath the Background Color patches … you will NOT have access to the Color-Wheel and Shade-Tint Box color choices.
But if you do see the link Show More Colors … you will have access to all the color patches you see as well as all the colors you can generate with the Color-Wheel and Shade-Tint Box (i.e., over 16 million).
If you need some help on what colors you might like (and most people do), here is a handy link that may help you with color choices: https://www.colorhexa.com/color-names
When you click the Show More Colors link (in the image above) … this is the image below you will probably see:
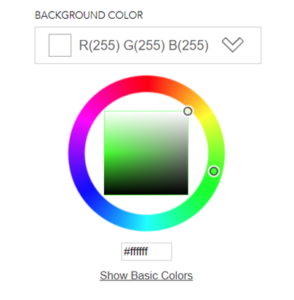
Note: In order to avoid future confusion … in the image above, the RBG decimal for the Color white is (255, 255, 255) and the Hex Triplet is #ffffff is for white color. And equally important for you to know: the RBG decimal for the Color black is (0, 0, 0) and the Hex Triplet is #000000
When you click anywhere on the Color Circle, the little position indicator (i.e., the little 0) will move to that position. This “anchors” a color position you want to shade or tint some more (i.e., inside the Shade-Tint Color Box).
When you click anywhere inside the Shade-Tint Color Box, the little position indicator (i.e., the little 0 ) will move to that position. You are actually shading and/or tinting a color you have already “anchored” on the Color Wheel.
Note: Any color that you have “anchored” on the Color Wheel can be shaded all the way to Black or tinted all the way to White. Experiment … and you can prove this to be true for any color on the Color Wheel.
OBSERVE CHANGES CAREFULLY
This is what you can observe in the image above when the Color Wheel/Color Box is being used:
-
- BACKGROUND COLOR box will show the product color patch and the RBG color code.
- Code Box beneath the Color Wheel/Color Box image will show the current color Hex code.
- If you already have a Hex code … you can type it into the Code Box beneath the Color Wheel (i.e., if you copy and paste a code in the Code Box it does not always work).
- If you click the Show Basic Colors link … you will return to the product Color Patch choices (and the Color Wheel will disappear).
Reference for color ideas and Hex codes: ColorHexa or copy and paste this link in you browser window: https://www.colorhexa.com/color-names
Note: If you are using the print book of this edition, type this link into your browser for information … and you can add the Hex triplet (i.e., the code) into the Code Box to put that color on your FAA product when you are trying to make a color decision for your product.
Color Circle / Color Box Operations:
Reminder: As an example, use our Fine Art America (FAA) website to follow along with these directions since we know it best: https://mitchell-watrous.pixels.com
Click > https://mitchell-watrous.pixels.com to get started and to access the products on our website. Here is a brief outline of what to expect:
-
- Only takes around 5-10 minutes to master this simple process.
- The Color Circle (or color circle with color box) will apply to most products on our website … except the “Wall Art” and “Apparel” categories.
- Also, a “Slider Bar” used to adjust image sizes will not be available for “Wall Art” since those images are already set for various size options.
- The “Slider Bar” will be operational for most other products to vary the size of the image being applied to a product background … and to regulate the size of the background or border area on the product.
- Once you learn how easily the Color-Circle and Color-Box work together, this will greatly enhance your ability to select the exact colors you want for all of your color-coordinated items.
- The purpose of the Shade-Tint Color-Box … is to Shade or Tint the color you choose from the Color-Circle.
Note 1: Play around with these options all you want to … you cannot break anything!
The little 0 will stay in the same position inside the Color-Box even when you change to a different color on the Color-Wheel to see what it looks like.
The full color (or color with a balanced shade and tint) is usually found by placing the little 0 about half-way up the left side of the color-box.
To see what this position looks like … type in the hex code for the color red #ff0000 … in the rectangular Code Box beneath the image [note: use zeros NOT the alpha letter o ].
Moving the little 0 from that position will add or subtract shade or tint, depending upon which direction you move the little 0 inside the box.
Don’t be afraid to experiment … but just remember to leave the little 0 inside the Color-Box in the color position that you desire to have on your product.
Note 2:
Each time you make a color change on the Color Wheel and Color Box, you can see the color change occur in two different places:
-
- The background color will change on your product. (Note: If you do not like the relationship sizes between the image and the background color, you can also change the size of the image with your “Image Size” slider bar while you are experimenting with colors at any time.)
- The small square color patch inside the BACKGROUND COLOR box will also change and correspond with the background color on your product.
You will also see the value for Red-Green-Blue (or RBG) change inside the “Background Color” box.
Note 3: This is part so important … review it until you totally understand it!
OK … this is really easy to understand … once you take a deep breath … relax your jaw muscles … unclench your fists … stop squinting your eyes … and exhale with a smile. You got this! And … with a little practice … you will own it!
An understanding of what happens within the Color Wheel/Shade-Tint Box can greatly increase your efficiency in finding and evaluating the color choices you can discover (… over 16 million can be a little overwhelming).
THE SHADE/TINT BOX
This box is the key to exploring the various colors you can find:
-
- The little 0 placed anywhere on top horizontal line of the box will give a Hex value of #ffffff and an RBG value (255, 255, 255) … the White Color.
-
-
- And moving the little 0 around anywhere on the Color Wheel (i.e., in the color circle outside the box) does NOT produce any color change … and the Hex value remains #ffffff
-
-
- The little 0 placed anywhere on bottom horizontal line of the box will give a Hex value of #000000 and an RBG value (0, 0, 0) … the Black Color.
-
-
- And moving the little 0 around anywhere on the Color Wheel (i.e., by clicking to change its position on the color circle) does NOT produce any color change … and the Hex value remains #000000
-
-
- The left Vertical Line of the box Shade-Tint Box controls the actual basic colors with which you can work. Place the little 0 in the middle of the left Vertical line (i.e., on the Shade-Tint Box).THEN, click anywhere on the Color Wheel … to move the £ around anywhere in the Color Wheel. Watch four changes take place:
-
-
- on the Product,
- the Background Color Patch,
- RBG color values … and the
- Hex Color Code Box value.
-
-
- The little 0 placed on right Vertical Line for a color basically produces shades of grey ranging from White to Black.
-
-
- Note: Click from top to bottom on the right Vertical Line and watch the color changes.
-
After reviewing the four steps above … try this:
-
- Place the little 0 in the center of the Shade-Tint Box;
- Tap and release the little 0 anywhere on the Color Wheel … watch the colors change;
- When you see a color you like on the product … play around with it;
- Left-click around anywhere inside the Shade-Tint Box … watch the product colors;
- Watch the colors continue to change as much as you like … you cannot break it!
- Choose the color you like … (i.e., your color code will be in the Code Box … copy it);
- Or, go back and keep the Default color.
Just remember … you can go back and change any color you do not like before you order it.
TROUBLE SHOOT COLOR PROBLEMS
For: Color Problem on Color-Circle / Color-Box
For example: Solid Black color … or … No color in THE BACKGROUND COLOR box (or on the product image).
You are trying to change the color for the product on the Color-Circle, but it will not change no matter what you do.
You have clicked all over that darn Color-Circle, but the little BACKGROUND COLOR patch stays a solid black color … and cussing doesn’t even help.
Look down inside the Color-Box (i.e., remember, it’s inside the Color-Wheel) and you will probably find that the little 0 is somewhere inside the Black color inside the Color-Box … or on the bottom horizontal line.
Just put your little 0 back inside the Color Box (on a color), and click it with you left mouse button. You will probably get an instant color change in your BACKGROUND COLOR box.
The opposite problem occurs when the little 0 is somewhere along the top horizontal line of the little Color-Box in the “white” color area.
No matter how much you click the Color-Circle (and cuss), that darn little color patch inside the BACKGROUND COLOR box stays colorless … or white.
Use the same solution for correcting a “black” color. Just put your little 0 back inside the color box (on a color), and click it with you left mouse button. You will probably get an instant color change in your BACKGROUND COLOR box.
This is one of the most important blogs you will need to master in order to be an effective FAA website developer, operator or buyer.
This important blog is a little longer than my others … with a lot of important details … but It is easier to master than you think!
Be prepared to review this information until you are its master … and once you get it … you will know more about colors, shading, and tinting than most people in the world!
The book offered below has expanded-additional information about the Color-Wheel + Shade-Tint-Tone Box.
In case you have not had the opportunity to do so yet, here is the order information for the important tutorial book that can help you through many rough spots on FAA websites:
How can you get the book? Once again … here is the information:
| https://www.amazon.com/dp/B0BTFRP4P3 | [$4.97] eBook |
| https://www.amazon.com/dp/0981862845 | [$11.97] Print Book |
The print book is also very good … and many people prefer to have a print book in addition to an eBook.