


Blog 14: Art Options To Consider

Blog 14: Art Options To Consider
There Are Many More Print Art Options To Consider
This blog will be a refresher to reinforce some information in previous blogs that may have been missed.
To begin: You can open and play around on this website: https://mitchell-watrous.pixels.com (and keep it open in a handy place such as on one of your tabs, or down in your bottom tray). (Note: This is my website which I use mainly for tutorials and training … but you can buy anything on it if you want to.)
Click > Collections (currently 30+). Explore a little bit … there are over 1300 images in different Collections. Be aware that not all FAA artists list any of their images in a “Collections” category … but have them spread throughout their websites.
In this blog I want to show you how to go find, buy, and/or use other artists’ websites and their art.
NOTE: It does not matter which image you open in ANY FAA ARTIST’S website (i.e., over 1 million FAA Artists!). You can use any image on ANY product on just about ANY FAA website.
Here are a few things you should know and do:
-
- If you use another artist’s image in your writings (i.e., blogs, websites, etc.) you must give them the courtesy of attribution (i.e., list their art title and their name).
- If you want to buy and sell their artwork, you can do that, too. I encourage you to go back and review Blog 1: Advantages For You in this blog series.
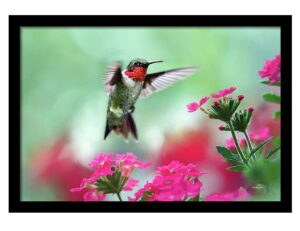
- For example, I am going to use an art piece below by Christina Rollo called Ruby Garden Jewel and show how to find it and “dress it up” by using Fine Art America tools.
- Experiment … it’s great fun (i.e., Christina Rollo artist’s image below) … here are some things you can do with ANY artist’s artwork!
Go to: Click > https://fineartamerica.com/ … and find something you like (i.e., notice that there is a Collections category on the main FAA website … which you might want to explore later).
Nevertheless, we will use the Search function to find just about anything possible that we might want.
Near the top, Click > Search (in the box) … and it will split into two options in the Search Box:
If you are only doing a keyword look up … just ignore the Keyword V section … and place your mouse cursor on top of the word Search and type a keyword directly over top of it.
But … if you already have some specific information you want to search … do the following …
Click > Keyword V … and we will have a menu with four “Search” options drop down for us:
-
- Artist
- Keyword + Artist
- Title
- Title + Artist
If we already have a title and an artist, (i.e., if we already have: Ruby Garden Jewel Photograph by Christina Rollo) … we can simply follow this process:
Click > Keyword V … then, Click > Title + Artist … then type in Ruby Garden Jewel + Christina Rollo * (i.e., where the word Search appears) … and Click > Enter … or Click the ![]() (* Note: You must type the + sign. Do NOT type the word by to replace the + sign. If you do … you will probably get NO MATCHES.)
(* Note: You must type the + sign. Do NOT type the word by to replace the + sign. If you do … you will probably get NO MATCHES.)
A successful Search should pull up a page with several images. Look around until you see one called: Ruby Garden Jewel Photograph (note: you might find it down in a section called ” VIEW ALL RUBY GARDEN JEWEL CHRISTIN … )
OR … you might not find the image at all … and get a message of: NO MATCHES (i.e., this could happen with any image search).
In that case … don’t give up. Just “Refresh” and go back to the Search box and do a simple Keyword search:
-
- Place mouse cursor in search box … and type keyword over top of the word > Search
- Type > Ruby Garden Jewel … and Click
 (or Click > Enter … on the keyboard)
 - Find and Hover
 over the image > … Ruby Garden Jewel Photograph
 - Then, Click > image … and another page with about 13 image options appears.
- Then, Choose and Click > Framed Print (i.e., from the 13 images).
So … let’s go! If you still have your image … or if things did not quite go right for you … Click > the link below that will get you there:
https://fineartamerica.com/featured/ruby-garden-jewel-christina-rollo.html
Click > Framed Print in the menu (while on the “working” website), and you should open a new page that looks like this one that you can use for making changes: *
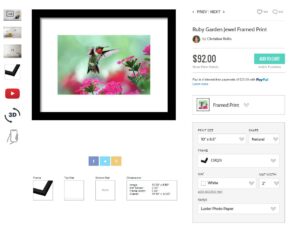
* Notice to the left of the Framed Pint that there are seven small icons in a vertical row. You can click on those to see what the Framed Print could look like on your wall.
Remember that the image shown above here is just a demo. You will have to go back to the
“working” menu page to make change (i.e., while reading this blog).
Next … Click > Print Size …then, Click > SHAPE
5 Sizes for Natural SHAPE print options
2 Sizes for Vertical SHAPE print options … look for a teaching moment. Notice of cropped photo
2 Sizes for Horizontal SHAPE print options … look for a teaching moment. Notice of a cropped photo … and this one is cropped (I would not choose this one).
2 Sizes for Square SHAPE print options … look for a teaching moment. Notice of a cropped photo … this one is also cropped (I would not choose this one either).
A Notice of cropped photo usually indicates that the photo you receive will NOT have all of the image data that you should receive in the Natural Print options … and this could happen with ANY artist’s images that you might choose to order … so, be careful! Here is the warning message you might see when a photo may be cropped (i.e., cut):
You’ve selected a cropped version of the artist’s design. Please make sure that you’re OK with the cropping before placing your order.
Click > FRAME to choose from about 12 different FRAME COLORS ( i.e., Beige through Yellow). This is very useful for matching a frame color with the colors in an image or a wall color.
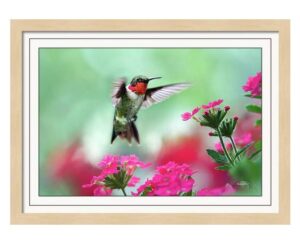
Click > None if you do not want a frame around your art-work image. In this case, your image will appear as a single, flat image without borders or frames … but be sure to click Natural SHAPE to ensure that you will not receive a cropped image.
VERY IMPORTANT POINTS
-
- WATCH FOR CHANGES …. to occur on your artwork … every time you click to choose an option to change something [be patient … computer processing speeds vary … and your change might not pop up instantly].
- Be sure to click on EACH FRAME COLOR to see how many frame designs are actually available for that color (i.e., changes sometimes occur).
- Beige color has only one Frame choice … while Black color has 26 Frame choices (at this time).
- In this example I will choose SLW6 (Black with Silver) Frame. (Hover mouse-pointer over each Frame icon for style information … and choose the one you prefer.)
Note: Most of these Wall Art images come with pre-attached hanging wire, mounting hooks, and nails (when applicable) … and usually ships within 2-3 business days. There is a 30-day money-back guarantee (whether for yourself or sent as a gift).
Top and Bottom Mats
Click > NONE if you do not want any Top Mat or Bottom Mat borders around your framed image. Note: You will have 8 Top Mat color choices (i.e., the color next to the Frame) … and the number of color choices may vary over time.
When you choose a Top Mat you will have the option to include a Bottom Mat (the color next to the image) … and there are about 8 color choices for the Bottom Mat … and the number of color choices may vary over time.
You can do some amazing things in this menu. Many people do not know this, but you can “dress up” your images with hundreds of option variations in sizes and colors with your Top Mat and Bottom Mat color options.
Here are just four examples … with the same art example … observe the differences used for each example:
-
- #1 …Playing with Frame, Top and Bottom Mats:
- Print Size/Natural: 20″ x 13.5″
- Frame Color: Black Frame: CRG13
- Top Mat Color/Width: None *
- Bottom Mat Color/Width: None *
* This is an example of a Framed Print without any Top or Bottom Mat borders between the frame and image. Some buyers (but not all) prefer some photos without Mats.
Note: You should also try all Black Frame options to see which one brings out the best qualities of the art and its surroundings. Notice that there are several vertical icons (in the working image website) … which you can click … to can give you some ideas of what the art will look like on the wall).
-
- #2 …Playing with Frame, Top and Bottom Mats:
- Print Size/Vertical: 24″ x 16″
- Frame Color: Most Popular Frame: SLW5
- Top Mat Color/Width: White/2″
- Bottom Mat Color/Width: Smooth Black/1″
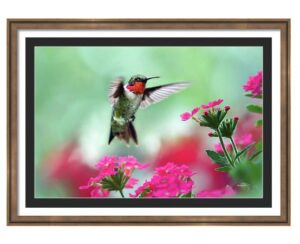
Note: How the size, color, and presence of Top and Bottom Mats affect your art image. Remember, you can change anything as many times as you like before you commit to purchase.
-
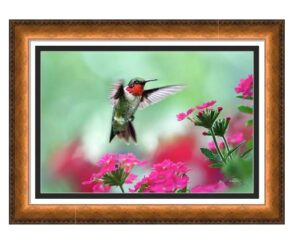
- #3 … Playing with Frame, Top and Bottom Mats:
- Print Size/Natural 24″ x 16″ Frame: HP2
- Frame Color: Most Popular Frame: SLW6
- Top Mat Color/Width: White with Black Core/2″ *
- Bottom Mat Color/Width: White with Black Core/1″ *
*If you choose the MAT color White with Black Core … it will add a border-line boundary around the color. In this case, it was chosen for both the TOP and BOTTOM MATS to show what you can do with it … and we see that there are two border lines. Play around with this option to see what you like when using it. (For example, a different Frame choice might really enhance this Framed Print.)
-
- #4 …Playing with Frame, Top and Bottom Mats:
- Print Size/Natural: 36″ x 24″ Frame: SLW6
- Frame Color: Black Frame: VN4 *
- Top Mat Color/Width: White/2″
- Bottom Mat Color/Width: Smooth Black/1″
* Here are some Big Tips for you … to save a lot of time and work:
-
- Choose the BLACK Frame Color because it currently gives you 26 Frame choices to work with.
- After you get all your Top and Bottom Mat sizes and colors … you can click around on all different frame styles to see which suits you best! However, click around on some other colors to make sure you did not miss any Frame choices.
- After you get everything set … you can go back and click on ANY option before leaving that image to see what effect a new change would make.
Color Choices
Before all is said and done … and no matter how much I research … I cannot find any other source that has as many talented, professional artists, and resources as Fine Art America.
Go back to Blog 1: Advantages For You in this blog series and review Table 1 to totally prepare yourself for the most helpful adventure you can take in discovering the greatest art in the world … and what you can do for yourself and your gifts.
The color choices for the Top Mat and Bottom Mat borders are limited to 8 of the same colors for each. Be aware that color options can change over time.
Enjoying art for the sake of art is one approach life. However, many people are interested in the appearance of an art piece … and how it looks wherever it is placed.
For example, what are you trying to color-coordinate? You can find a million ideas on the internet for ways to decorate you living space with various colors, objects, and art. Here are just a few:
https://www.thespruce.com/choosing-artwork-by-room-4155124
https://www.housepaintingtutorials.com/wall-color.html
You can find millions of helpful resources on the internet … but sometimes, if you can afford it … it may be best to ask for help from an interior decorator if you have a large or expensive project.
But one thing is for sure … and keep this in mind … there is no larger company with most of the world’s top artists producing their art products than on Fine Art America websites. I have not been able to find better art … or artists … anywhere in the world!
And, if you are just looking for some helpful information about color and combinations, here is an excellent link to get ideas for colors: https://www.colorhexa.com/color-names
-
- When I go there and type in a color, I find several interesting things. In this case, I will probably look at “Split Complementary Colors” since I am looking at frame colors as well as two colors for the Top and Bottom Mats.
- Since my colors options for the two Mat colors are limited to color patches, I am going to try to find some color patches that come close to matching my Frame Color. In other words, I will not find exact matches, but I can find some colors that come close. (The small number of Mat color options is my biggest complaint for FAA.)
- Note: When I published the accompanying book … there were many more color choices to Top and Bottom Mats. As more people get into the art production business (and begin using Fine Art America warehouses) … the variety of Top and Bottom Mat colors may expand again. We who use this business will really appreciate it.
Important Note: Sometimes a computer might “hang up” and become unresponsive … and refuse to make the changes you want fast enough. That is very irritating … and I know it does happen … because it has happened to me.
Why does that happen? Could be many reasons … but sometimes it could just be an issue with “computer capacity, processing speed, excessive cache, or memory” or some other issue.
When that happens … just click-out of the process … and start all over. Go back to the link you started with … and start experimenting again.
In some cases, you might even have to refresh or reboot your computer when it seems to get “locked-up” … and defies any attempt to cooperate with you.
As you can see … you can have fun and play all day with hundreds of options at your fingertips … and as you will see later it could be profitable for those in business.
For example, you can change the picture sizes, types of frames, and types of Top and Bottom Mats. Note: You can also change the sizes of the Top and Bottom Mats for additional visual effects.
If you do not wish to have a Bottom Mat at all … just leave it out … and your Top Mat becomes a border that will fill in the color space between your image and the inside of the frame. You don’t have to be in a hurry to create perfection … just take your time and totally enjoy the process.
Can you imagine … you could send two friends the same picture image with totally different color schemes and effects just by varying the choices of all your options for each image.
By the way … I have shown you only a few of the hundreds of thousands of variations you can make yourself with just that one image … and you can do this with any of the images you find on other artists’ FAA websites (more about that in a future Blog).
PAPER: There are two basic ways to order the type of paper you want to use for your images … but that will NOT change the type of paper you can choose:
-
- Select the recommended Paper type for your “Framed” images when you choose that option. This is the option that most non-professional photographers will probably choose.
- Select the Paper type for the images you want without a Frame (i.e., NONE). This option might be chosen by a professional photographer with the skills for this process.
There are 8 options for the “type of paper” used to imprint an image. Unless you are a professional photographer, you might want to seek some professional guidance before trying to order and mount your own images … or just select the “preferred or recommended” paper option.
However, to select the “Paper” quality for your images, follow these steps:
-
- Choose the PRINT SIZE you desire for your application.
- Choose the SHAPE for your application (Note: Make sure that the SIZE and SHAPE will properly display the image you have chosen … i.e., not cropped!)
- Sometimes it is best to choose the recommended paper type indicated.
You will find 8 PAPER options. Be sure to Click > on the ⊕ Symbol beside each paper-type and finish … to get further information about each paper type (i.e., remember to do this on your active link):
-
- Archival Matte Paper ⊕
- Glossy Photo Paper ⊕
- Luster Photo Paper ⊕
- Semi-Matte Photo Paper ⊕
- Picture Rag ⊕
- Somerset Velvet ⊕
- Watercolor Paper ⊕
- Metallic Paper ⊕
Note what the (recommended) paper type is … but if you want to refine your paper choice, you should review the “paper-type” details in the ⊕ symbol beside each paper type.
Note: On many products you will be able to place, or position, the image and re-size it … but this option is NOT available on Wall Art (as noted by the absence of any “Slider” options to resize or reposition an image).
In case you have not had the opportunity to do so yet, here is the order information for the important tutorial book that can help you through many rough spots on FAA websites:
How can you get the book? Once again … here is the information:
| https://www.amazon.com/dp/B0BTFRP4P3 | [$4.97] eBook |
| https://www.amazon.com/dp/0981862845 | [$11.97] Print Book |
The print book is also very good … and many people prefer to have a print book in addition to an eBook.